补环境框架:document.all的c++方案(二)
代码实现请看文章:补环境框架:document.all的c++方案(一)
文章一中我们探究了完整的代码实现及思路,该篇我们继续探究下测试及打包流程。
在node官网关于addon打包的章节中,node官方是推荐我们用node-gyp打包:
Once the source code has been written, it must be compiled into the binary addon.node file. To do so, create a file called binding.gyp in the top-level of the project describing the build configuration of the module using a JSON-like format. This file is used by node-gyp, a tool written specifically to compile Node.js addons.
因此在sdenv中我们打包也是用的node-gyp,由于是打包c++代码,需要系统里有c++编译环境,如mac的Xcode,windows的Microsoft Visual Studio,node-gyp本身也用到了python,因此还需要安装python。需要注意的是,Visual Studio安装过程需要勾选使用C++的桌面开发选项。

如果node-gyp依赖的python和C++编译环境没有成功则sdenv执行npm i是会报错的,等这两个安装完成之后再次执行npm i依赖安装就不会报错了,新版已不用执行build,以下无效,依赖安装成功后执行打包命令,生成bin/documentAll.node文件:
windows系统执行:npm run build:win
其它系统执行:npm run build
打包成功之后执行命令进行功能测试:
node node_modules/.bin/jest ./test/documentAll.test.js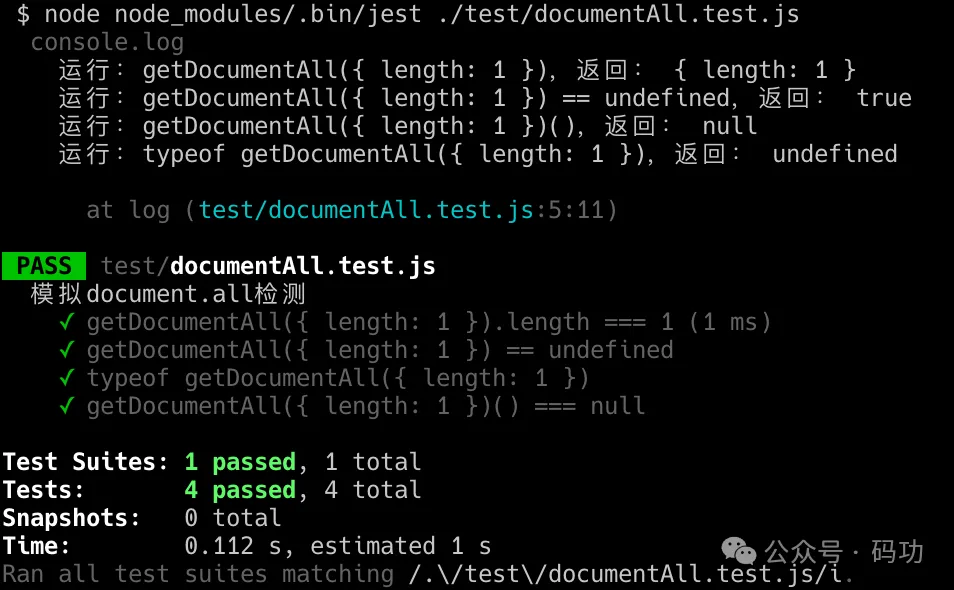
如截图,全部绿色勾勾就是测试通过。测试代码如下:
const getDocumentAll = require('../bin/documentAll.node').getDocumentAll;


describe('模拟document.all检测', () => {
  const da = getDocumentAll({ length: 1 });
  console.log(
    '运行:getDocumentAll({ length: 1 }),返回:', da,
    '\n运行:getDocumentAll({ length: 1 }) == undefined,返回:', da == undefined,
    '\n运行:getDocumentAll({ length: 1 })(),返回:', da(),
    '\n运行:typeof getDocumentAll({ length: 1 }),返回:', typeof da,
  );
  test('getDocumentAll({ length: 1 }).length === 1', () => {
    expect(da.length).toBe(1);
  });
  test('getDocumentAll({ length: 1 }) == undefined', () => {
    expect(da == undefined).toBe(true);
  });
  test('typeof getDocumentAll({ length: 1 })', () => {
    expect(typeof da).toBe('undefined');
  });
  test('getDocumentAll({ length: 1 })() === null', () => {
    expect(da()).toBe(null);
  });
});
至此就可以在sdenv补环境框架中过document.all的检测了,需要注意的是文件bin/documentAll.node只能在当前系统环境下使用,如果换了电脑那么还得重新打包。